How to Choose your Professional Women’s Clothing Manufacturer
July 30, 2018
Fashionable Women’s Apparel Ideas
August 9, 2018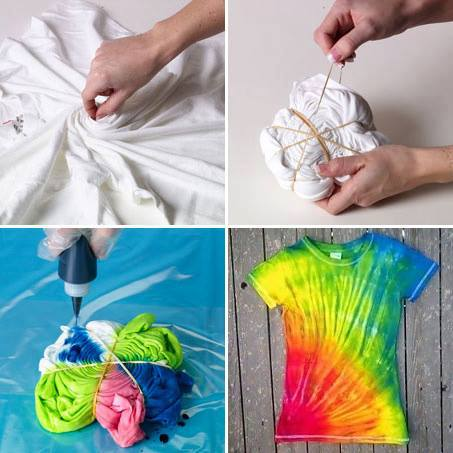
Before you start any project, the first thing you want to do is pre-wash the fabric or the shirt you will be using. This ensures your fabric will be free of any residue that may be left from the factory or shipping process and whenever you trying to choose which fabric to use for your project, just keep in mind that natural fabrics like cotton, linen or silk work best. Try to avoid synthetic fabrics like acrylic, rayon, and polyester. You can dye the fabric either wet or dry, but the dye socks in and spreads better when you are working with dump fabric.
Tie-dying is very messy, protecting your clothing, skin, and workspace is crucial. Start by covering your work surface with a plastic sheet, this could be a plastic tablecloth, plastic wrap or even a trash bag. For most techniques you want your fabric to be raised off the table so that the dye can drip all the way through and off of the fabric. An easy way to do this is to place a cooling rack in the center of the plastic its recommended to lay down a few paper towels under the rack to catch the excess dye as it drips. It is a good idea to wear an apron so as not to get dye on your clothes. And don’t forget to put on plastic or latex gloves as the dye will temporarily stain your skin if it comes to contact with it.
Preparing the dye
Always prepare the dye according to packing directions. Each brand varies just a little from the other. When you are tie dying you would probably want to use several colors together but there are some color combinations you might want to avoid (orange and green, green and purple, purple and orange) this generally end up making a muddy brown color which may not the color you were expecting in your design.
Tying your pattern
Depending on the project you that you are working on, you may have the option to use either zip tie or rubber bands to hold your fabric in place while you are dying. Zip ties can be pulled tighter than rubber bands but rubber bands are generally easier to use. You might want to use zip in such scenarios, if you are working on a thicker fabric project or if you are working on larger items like curtains and pillowcases
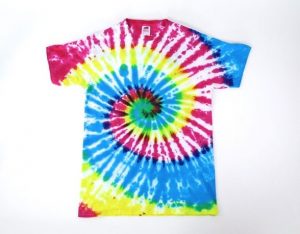
Tie-dying your spiral t-shirt
Now that you have all the required tools and set up your workspace, lay your t-shirt on your workspace, find a point on your shirt where you want the spiral to begin it could be right in the middle or off to the side. Pinch that spot with your finger and start to twist, with your other hand smooth the rest of the shirt as you go making sure the fabric folds up nice and even. You want to end up with sort of a cinnamon shape. Next, take a few rubber bands and pace them evenly around the t-shirt to create wedges, use four to six rubber bands depending on how large your shirt is or how much variety you want. Put you bundled shirt on top of the cooling rack and get ready for the fun part. use the wedge shapes as your guide and begin adding your dye colors in the design desired on the different wedge parts. When your fabric is saturated with dye carefully wrap it in plastic and let it sit for six to eight hours. With the rubber band still in place rinse your shirt under water until the water runs clear. Remove the rubber bands and wash it by itself in the washing machine on the hottest setting your fabric can take. And there you have a tie-dye spiral t-shirt.